Photo to Coloring Page Guide: Choose, Check and Print
Updated 2026-09-07 · 7 min read
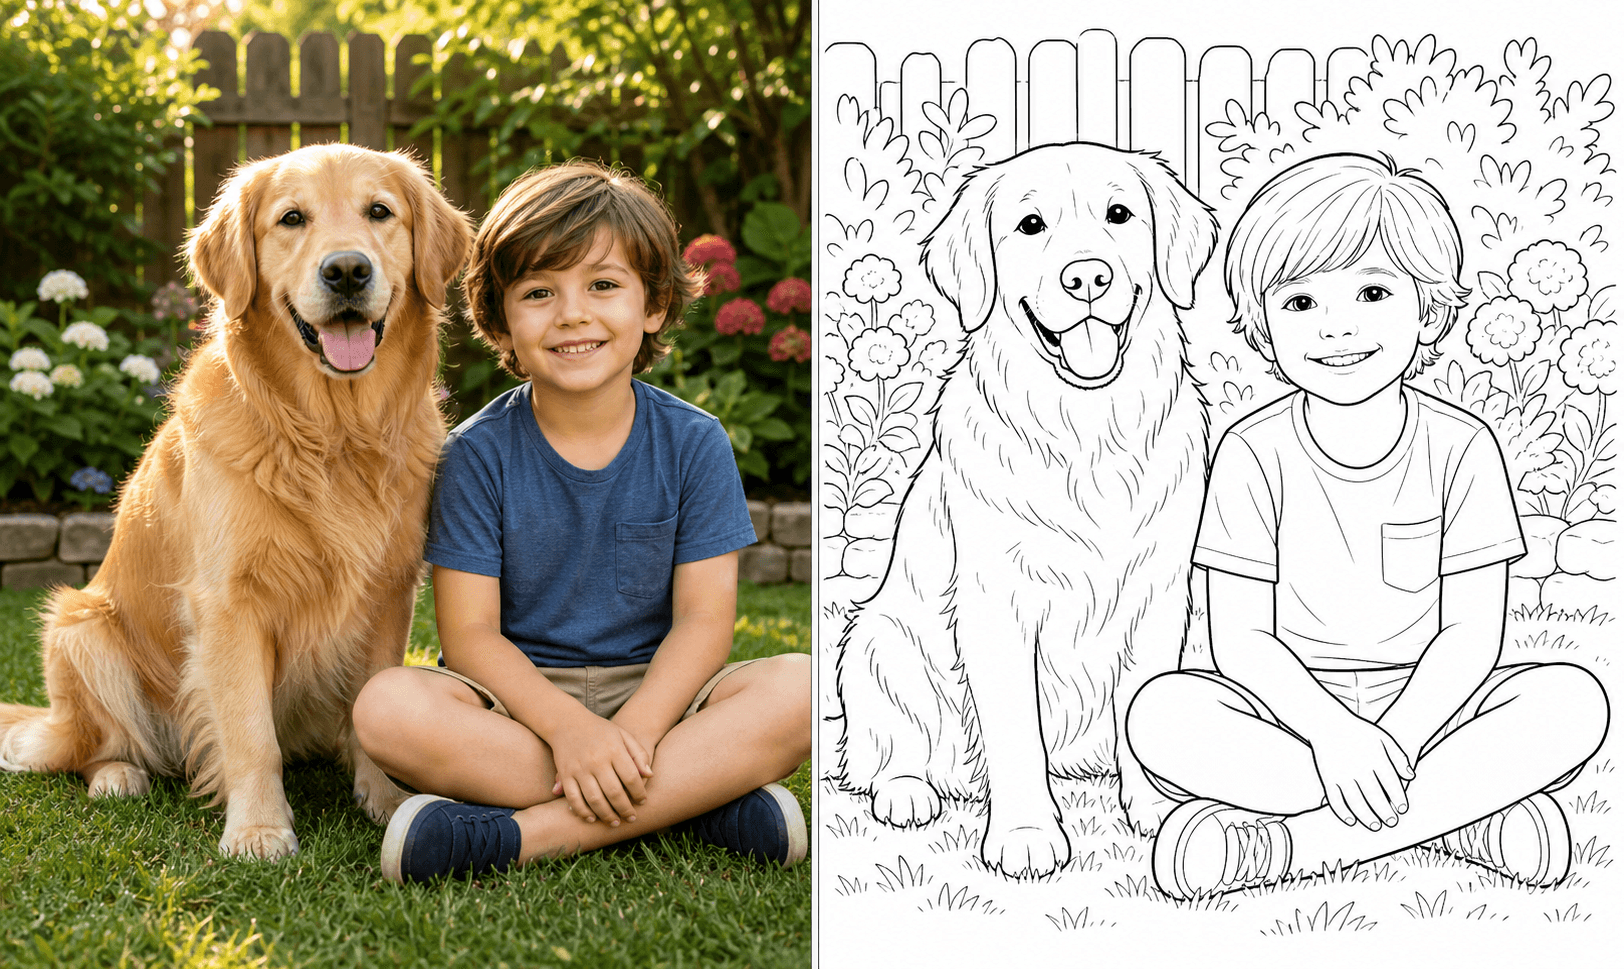
Real example: the source photo and its generated result appear side by side.
Choose a sharp, well-lit photo with one clear subject and a calm background. After conversion, inspect the silhouette, face, hands or paws and enclosed coloring spaces. Fix weak source photos before repeatedly changing settings, then download the full PNG and test-print it at 100% or Fit to printable area.
 Source photo
 Printable line art
Three checks that prevent weak results
- 01The subject is sharp, well lit and not cut off by the frame.
- 02The background supports the subject instead of competing with it.
- 03The final outline has recognizable features and comfortable spaces to color.
Choose by what you want to do next
Follow the five-step workflow
Choose one photo, upload it, review the line art, download the full file and print a test page.
Start with the photo tool →Troubleshoot the source
If the outline is muddy or the subject is unclear, fix the photo before changing every setting.
Use the quality checklist →Choose a photo that can become a clear outline
A good source photo gives the generator an obvious subject and enough contrast to decide which edges matter. Pick a portrait, pet, family moment, building or object that is in focus and mostly complete in the frame. A simple background is helpful because the result has more room for recognizable contours and comfortable coloring regions.
Do not begin with the most dramatic photo in your camera roll if it is dark, blurry or crowded. A straightforward image with soft light often produces a more useful page than a high-resolution shot with several overlapping subjects.
- Keep the main subject fully inside the frame, including ears, hands, paws or important objects.
- Prefer soft front or side light; strong backlighting often removes facial and edge detail.
- Choose a calm background or crop distractions before uploading.
- Avoid motion blur, heavy filters and screenshots that have already been enlarged.
Upload one image and choose the page direction
Open the photo to coloring page tool and upload one JPG, PNG or WebP image at a time. The current upload limit is 10 MB. Choose the page settings and visual treatment that match the person who will color: younger children generally need larger regions and stronger outlines, while older children and adults can work with more detail.
If the result needs to preserve a specific object, pose or background detail, the prompt-guided photo workflow can give you a place to describe what matters. Keep the request focused; asking the page to preserve every small texture usually makes it less comfortable to color.
Open the photo-to-coloring-page tool · Try the prompt-guided photo workflow · Adjust complexity for the intended colorist
Generate, then inspect the line art before printing
Treat the first result as a review step, not an automatic pass. Check the face, eyes, hands, paws, important objects and the outside silhouette. Then ask whether the page is actually colorable: are the main areas enclosed, are the lines clean enough to follow, and is the background helping rather than filling the page with noise?
Regenerate when the main subject is missing, an important feature is wrong, anatomy is malformed, or the page is too crowded for the intended age. Small stylistic differences do not always require another attempt; recognition, completeness and colorability matter more than making every line match the source photo.
Compare photo-to-coloring-page and line-drawing outputs
Download the full PNG, not a screen preview
When the page passes your review, sign in to save the project, then use credits to create and download an unlocked PNG. The anonymous workflow includes one free watermarked Standard 1K preview; later generations and higher-resolution options are paid. Keep the original photo beside the generated page so you can compare details later or replace one page in a larger project.
If you are making several pages, name them in the order you intend to use them. For example, `01-family.png`, `02-dog.png` and `03-birthday.png` are easier to arrange than camera filenames. The tool creates individual pages; it does not automatically bind or ship a finished coloring book.
Print at the correct size
Before printing, choose A4 or US Letter to match your paper and use the full-resolution file. Set the print dialog to 100% or Fit to printable area, not Fill or Stretch. High-quality black-and-white or grayscale printing usually keeps outlines clearer and uses less color ink.
Print one test page before making a full set. Check that the subject is not cropped, the page is not stretched, and the printer margins are comfortable. If the result looks pixelated, return to the full-resolution download rather than enlarging a thumbnail.
- Use A4 or US Letter to match the paper loaded in the printer.
- Choose 100% or Fit to printable area; avoid Fill or Stretch.
- Print the downloaded PNG, not a browser screenshot or small preview.
- Test one sheet before printing a larger set.
FAQ
Can I turn any photo into a coloring page?
You can try many types of photos, but clear images with one recognizable subject, good lighting and a relatively calm background usually produce the most useful line art. Blurry, backlit and crowded photos are harder to convert cleanly.
What file types can I upload?
The photo workflow accepts JPG, PNG and WebP images up to 10 MB. Upload one image at a time and review the generated page before moving on to another photo.
Can I make a coloring page for a young child?
Yes. Favor a clear single subject, larger regions, thicker outlines and a simpler background. The right complexity depends on the individual child, so use the age guidance as a starting point rather than a strict rule.
Will my uploaded photo appear in the public gallery?
No. Personal photo uploads and their generated results are not automatically published in the public gallery. They are processed to create your result and handled according to the privacy policy.
Why does my printed page look blurry?
You may be printing a small preview or stretching the image beyond its useful resolution. Download the full result, match the paper size, and use 100% or Fit to printable area instead of Fill or Stretch.